Getting Started with WorkComposer
Set up your organization and start tracking team productivity in just a few minutes. Whether you're managing a remote, in-office, or hybrid team, WorkComposer makes it fast and simple to get started.
Welcome to WorkComposer
You're about to start your journey with WorkComposer, and we're here to guide you through every step of the process. Getting your team up and running is straightforward and takes only a few minutes.
In this guide, we'll walk you through creating your organization account, inviting your team members, and configuring essential settings to help you maximize productivity from day one. WorkComposer is designed to work seamlessly with your workflow, providing automatic time tracking, detailed productivity reports, and powerful monitoring tools without disrupting your team's work.
Let's get started with the three simple steps to launch your WorkComposer organization.
Step 1: Create Your WorkComposer Account
Setting up your WorkComposer account is quick and easy. Every new account starts with a 7-day free trial featuring unlimited features and unlimited users, so you can explore everything WorkComposer has to offer without any commitment.
Visit WorkComposer and Start Your Free Trial
Navigate to workcomposer.com and click the "Start Free Trial" button prominently displayed on the homepage. This will take you to the registration page where you can create your new account.
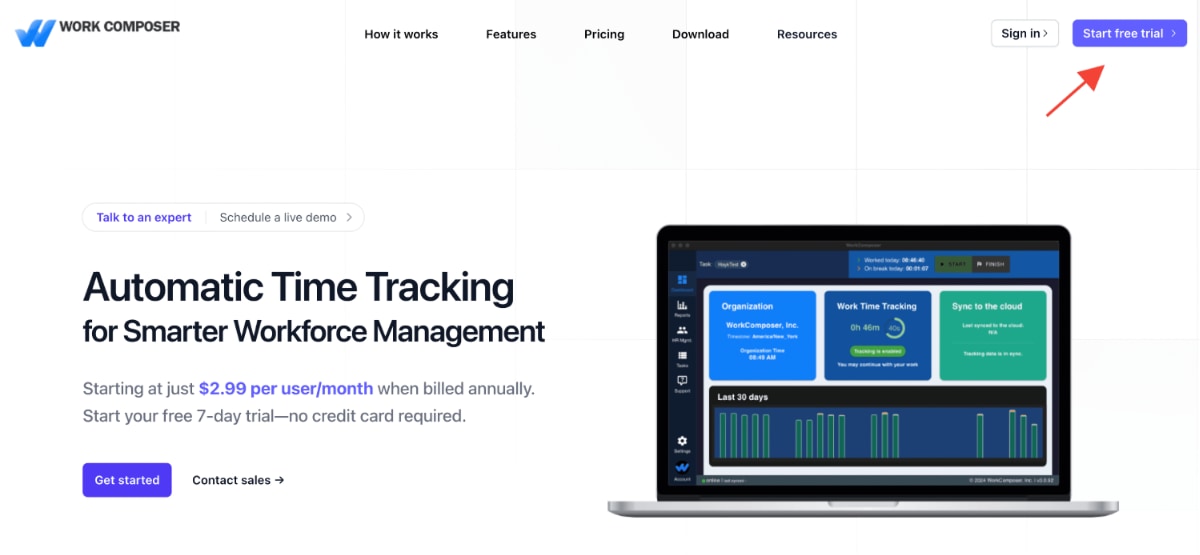
Click image to enlarge
Choose Your Registration Method
WorkComposer offers flexible registration options to suit your preferences:
- Email Registration: Enter your email address and create a password for full control over your credentials
- Single Sign-On (SSO): Register instantly using your Google, Microsoft, or Apple account for quick, secure access
Choose the method that works best for you. Both options provide the same full access to all WorkComposer features and ensure your account is secure.
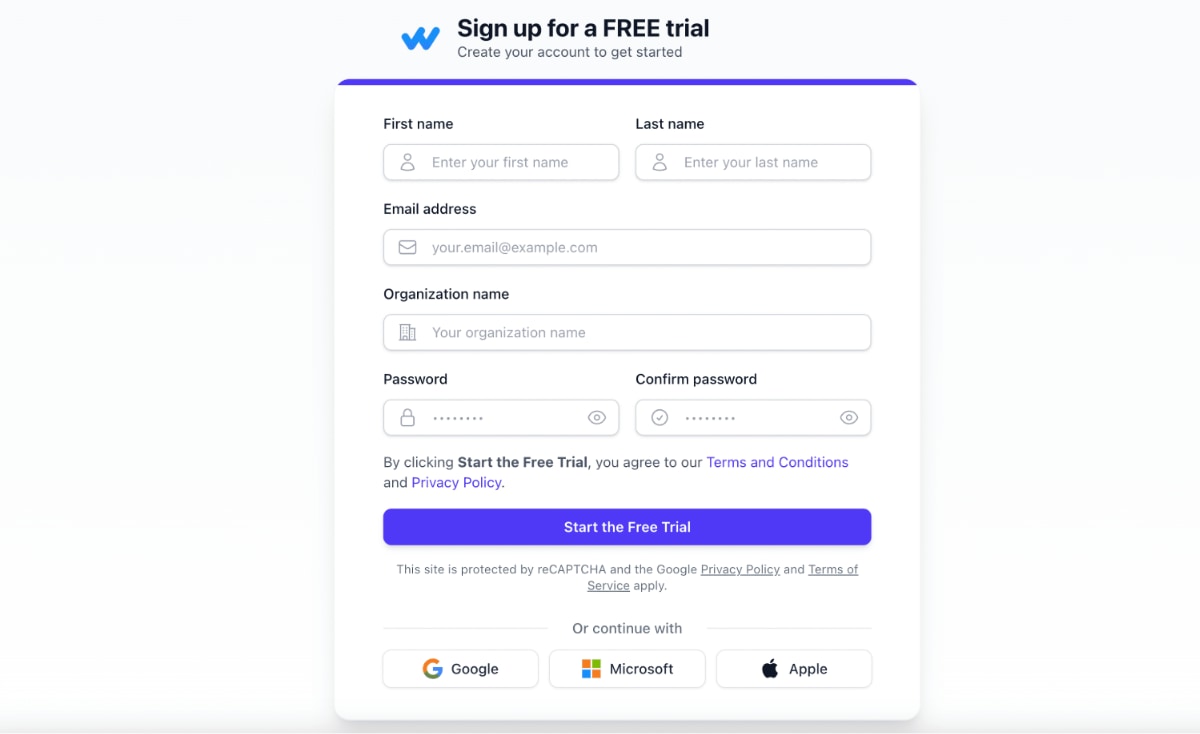
Click image to enlarge
Access Your Dashboard
Once you complete the registration and verify your email address, you'll be automatically redirected to your WorkComposer web dashboard. This is your central hub for managing your team, viewing reports, and configuring settings.
Congratulations! You're now part of the WorkComposer family. Your account is ready, and you can start setting things up for your team. The dashboard provides easy access to all the tools you need to invite team members, monitor productivity, and customize your tracking preferences.
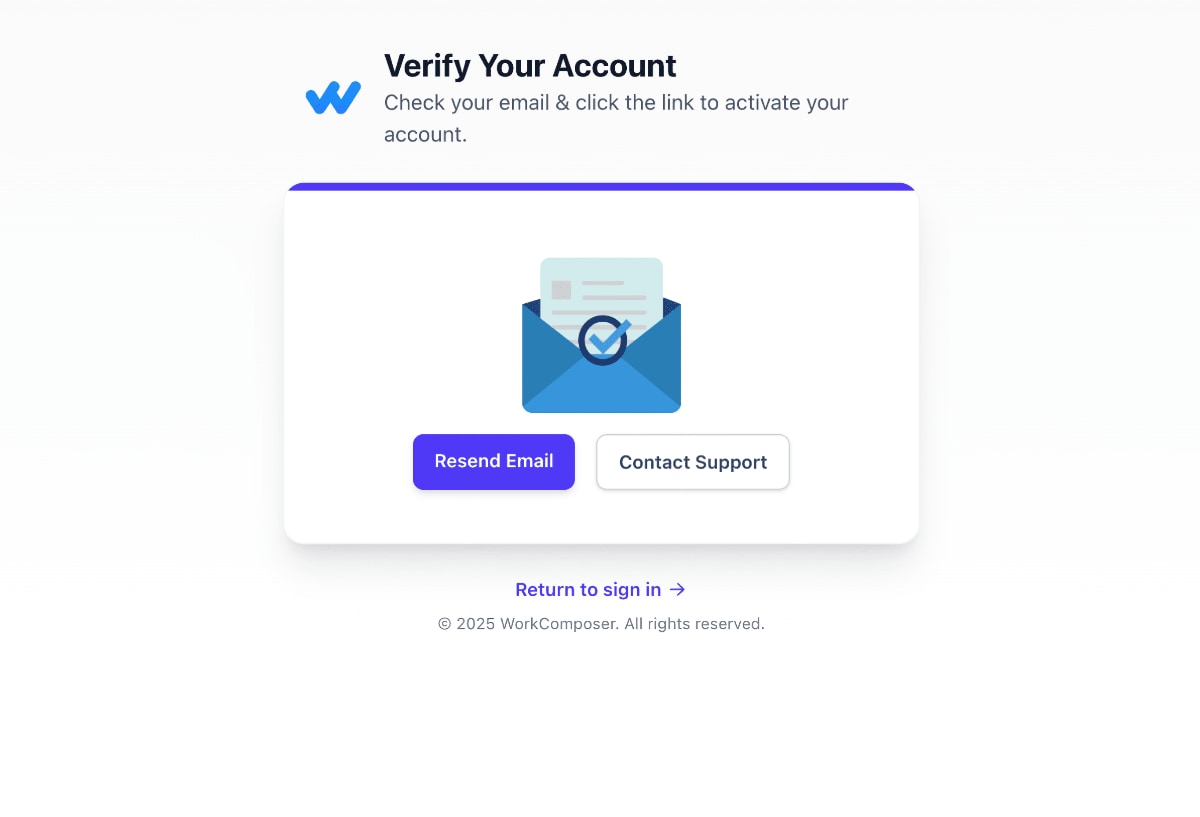
Click image to enlarge
Step 2: Invite Your Team Members
Now that your account is set up, it's time to invite your team members. WorkComposer makes it easy to add users individually or in bulk. Your team members will receive email invitations with instructions to join your organization, download the desktop application, and start tracking their work time automatically.
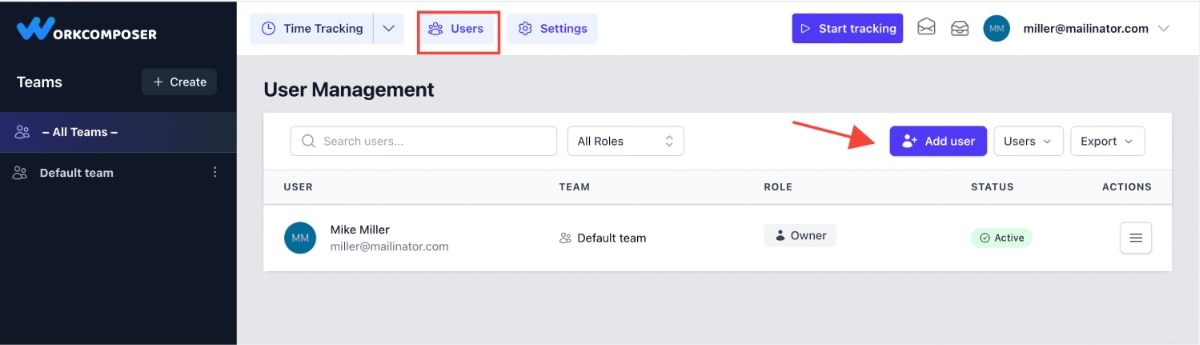
Navigate to the Users Section
From your dashboard, locate and click on the "Users" section in the main navigation menu. This is your central location for managing all team members, viewing their status, and sending invitations. The Users section gives you a comprehensive overview of your organization's members and their roles.
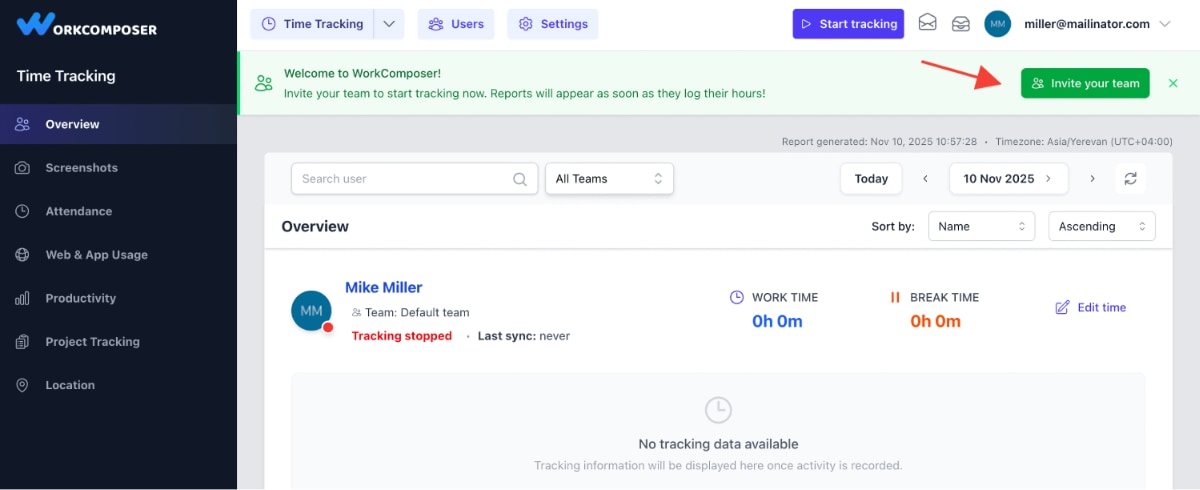
Click image to enlarge
Click "Add User" to Open the Invitation Form
In the Users section, you'll find the "Add User" button in the top-right corner of the page. Click this button to open the user invitation interface where you can add individual team members or use the bulk invite feature for larger teams.
Click image to enlarge
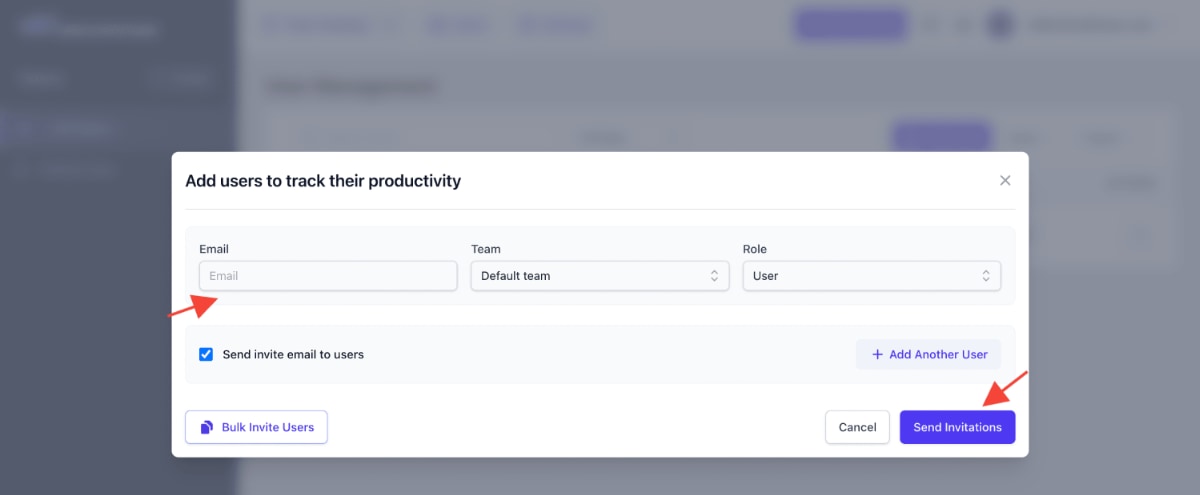
Enter User Details and Send Invitations
In the invitation form, enter your team member's email address and any additional details you'd like to include. You can also assign roles (such as Admin, Manager, or User) and team assignments at this stage, or configure these later. Click "Send Invitation" to deliver the invite email to your team member.
Pro Tip: For larger teams, use the Bulk Invite option to add multiple users simultaneously. You can upload a CSV file or paste multiple email addresses to save time and streamline the onboarding process.
Click image to enlarge
Team Members Receive and Accept Invitations
Invited users will receive an email with a link to join your WorkComposer organization. The email includes:
- A personalized invitation message
- Instructions to create their account (if they don't have one)
- A link to download the desktop application
- Step-by-step onboarding guidance
Once team members install the desktop application and log in, time tracking begins automatically—no manual start or stop buttons required. The app runs quietly in the background, capturing work time, application usage, and productivity data without interrupting their workflow.
Done! Continue inviting the rest of your team members to get everyone onboard and ready to track their productivity.
Step 3: Configure Settings and Start Monitoring
With your account created and your team invited, you're ready to configure essential settings and start monitoring productivity. As soon as users install and log into the desktop app, tracking begins automatically—no need to click "Start" or "Stop." You can monitor real-time activity, view screenshots, analyze productivity reports, and much more from your dashboard.
Let's walk through the key configuration options to help you get the most out of WorkComposer from day one.
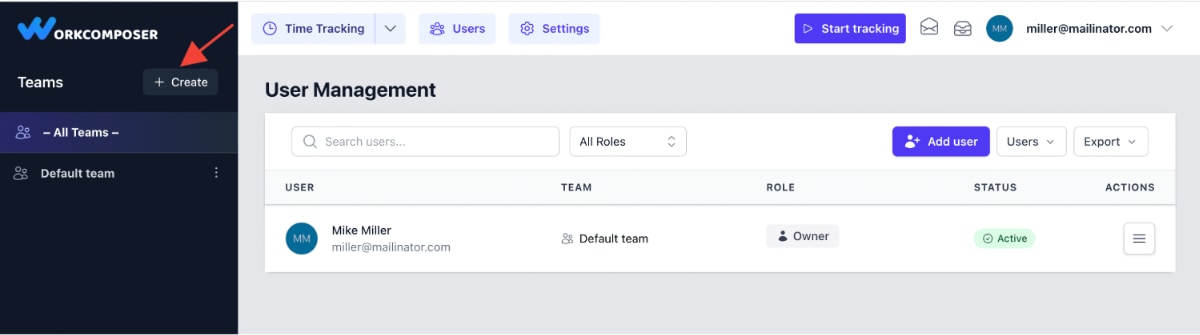
Create and Organize Teams
Organizing your users into teams makes it easier to manage large organizations, generate team-specific reports, and assign managers to oversee different groups. Teams can represent departments, projects, locations, or any organizational structure that fits your needs.
To create teams, navigate to the Teams section from your dashboard. Click "Create Team", give your team a descriptive name (e.g., "Marketing Team", "Development", "Sales West Coast"), and assign team members. You can also designate team managers who will have visibility into their team's productivity reports.
Click image to enlarge
Set Your Preferred Tracking Mode
WorkComposer offers multiple tracking modes to match your team's workflow and management style. By default, your organization is set to Automatic Mode, which tracks time automatically as soon as users log into their computers—perfect for remote and hybrid teams.
You can choose from these tracking modes:
- Automatic Mode: Tracking starts automatically when users log in—no manual intervention required
- Manual Mode: Users manually start and stop tracking when they begin and end work
- Silent Mode: Tracks automatically with minimal user visibility for discreet monitoring
- Extended Silent Mode: Provides minimal user visibility and control for dedicated work computers requiring comprehensive monitoring for security and compliance
To configure your tracking mode, go to the Settings section and select Tracking Preferences. Here you can also adjust screenshot intervals, idle time thresholds, activity detection sensitivity, and other advanced tracking options. Learn more about different tracking modes in our detailed guide: Time Tracking Modes.
Click image to enlarge
Enable Automated Email Reports
Stay informed about your team's productivity even when you're away from your dashboard. WorkComposer can automatically send detailed email reports directly to your inbox on a schedule that works for you.
To enable email reports, navigate to Settings > Email Reports. Here you can configure:
- Summary Reports: Daily or weekly reports showing team productivity, hours worked, and activity levels
- Warning Alerts: Notifications when users fall below productivity thresholds or exhibit unusual patterns
- Custom Schedules: Choose specific days and times for report delivery
- Report Recipients: Add multiple email addresses for managers and stakeholders
Email reports keep you and your leadership team informed without needing to constantly check the dashboard. They provide at-a-glance insights into team performance and help you identify trends over time.

Click image to enlarge
Explore Additional Configuration Options
WorkComposer offers many additional settings to customize your experience:
- User Roles and Permissions: Assign roles (Admin, Manager, User) to control access levels and capabilities
- Shift Scheduling: Define working hours, days, and schedules for accurate overtime and attendance tracking
- Projects and Tasks: Enable project tracking so users can log time to specific projects
- Productivity Classifications: Customize which applications and websites are considered productive, neutral, or unproductive
- Screenshot Settings: Adjust screenshot frequency, quality, and blur settings for privacy
- Privacy Controls: Configure privacy hours, excluded applications, and user data access
All these settings are accessible from the Settings section of your dashboard. Take time to explore and configure options that best fit your organization's needs and culture.
What's Next?
Now that you've set up your WorkComposer organization, invited your team, and configured essential settings, you're ready to start monitoring productivity and gaining valuable insights into how your team works.
📊 Explore Your Reports
Once your team starts working with the desktop app installed, you'll have access to comprehensive reports including:
- Time & Activity Reports
- Application & Website Usage
- Screenshot Timeline
- Productivity Analysis
- Attendance & Schedule Compliance
🎯 Optimize Your Setup
Get the most out of WorkComposer by exploring advanced features:
- Project-based time tracking
- Manual time entry and approval
- Integrations with other tools
- Custom productivity rules
- Advanced privacy settings
💡 Need Help Getting Started?
Our support team is here to help you make your WorkComposer setup seamless. Whether you have questions about configuration, need assistance with a specific feature, or want personalized guidance for your organization, we're just a message away.
Contact our Support team through the in-app chat, email us at support@workcomposer.com, or check out our comprehensive Knowledge Base for more guides and tutorials.
Ready to Transform Your Team's Productivity?
Start your 7-day free trial today—no credit card required.
Start Free Trial